

when creating labels, where do you indicate what your label size will be?
 Please Note: This article is written for users of the following Microsoft Word versions: 2007, 2010, 2013, 2016, 2019, and Word in Office 365. If you are using an earlier version (Word 2003 or earlier), this tip may not work for you. For a version of this tip written specifically for earlier versions of Word, click here: Creating Labels.
Creating Labels
![]()
Word includes a handy utility that allows you to easily create labels containing any wording you would like. For instance, you might like to have some labels that contain your return address, or others that serve as labels for products or collection items.
The first step in creating labels, believe it or not, doesn't even require Word. It involves running down to your local office supply store (OK—you can use a catalog or shop online if you want) and picking up the labels you want to use. If you haven't looked lately, it seems there are hundreds of different types of labels, each designed for a different purpose.
To use labels with Word, it is a good idea to either purchase Avery labels or look for their equivalents. The numbers assigned by Avery to their labels have in some sense become a standard for labels. In fact, many other vendors produce labels that use the same part numbers as Avery labels. These numbers will come in very handy when you start using Word to create your labels.
Once you have the labels you are ready to sit down and become creative. Simply follow these steps within Word:
- Display Mailings tab of the ribbon.
- Click the Labels tool, in the Create group. Word displays the Envelopes and Labels dialog box. (See Figure 1.)
- In the Address box, enter the text you want to appear on the label. Regardless of what Word says, this does not have to be an actual address, but can be any text. (If you want to use your actual return address, you can click the Use Return Address check box.)
- Click once on the label in the lower-right corner of the dialog box or click on the Options button. Word displays the Label Options dialog box. (See Figure 2.)
- At the top of the dialog box, specify the characteristics of the printer you will use to create your labels.
- If you did not get Avery labels (or labels that include an Avery number), use the Label Vendors drop-down list to select who made your labels.
- In the Product Number list, select your label from those provided. Notice that the labels represent the product lines of the label manufacturer you selected in step 6.
- Click on OK. Word closes the Label Options dialog box.
- In the Print area at the left side of the dialog box, specify whether you want to print an entire sheet of labels or a single label. (If you are going to reuse this label at all, it is much easier to print an entire sheet of the labels.)
- If you chose to print a single label, specify the position on the page where the single label should print.
- If you chose to print a single label, click on Print. The dialog box is closed and the label is printed.
- If you chose to print a full sheet of labels in step 9 click on New Document. Word closes the dialog box and creates an entire document that represents what your label sheets will look like. (You could choose Print if you wanted, but the New Document option is much more versatile.)
- Make any adjustments to the contents of the document. This means you can individualize each label, change fonts, change positioning, or do any other formatting task you want.
- Print your document (the labels) as you normally would any other document.
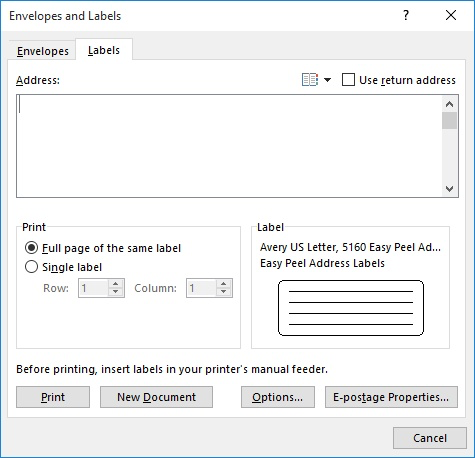
Figure 1. The Labels tab of the Envelopes and Labels dialog box.
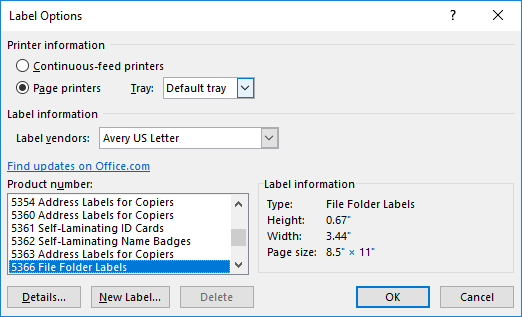
Figure 2. The Label Options dialog box.
WordTips is your source for cost-effective Microsoft Word training. (Microsoft Word is the most popular word processing software in the world.) This tip (12500) applies to Microsoft Word 2007, 2010, 2013, 2016, 2019, and Word in Office 365. You can find a version of this tip for the older menu interface of Word here: Creating Labels.
Author Bio
With more than 50 non-fiction books and numerous magazine articles to his credit, Allen Wyatt is an internationally recognized author. He is president of Sharon Parq Associates, a computer and publishing services company. Learn more about Allen...
MORE FROM ALLEN
Stopping a Conditional Formatting Rule from Breaking into Smaller Ranges
When you paste information into a row that is conditionally formatted, you may end up messing up the rules applied to ...
Discover More
Running Macros on Hidden Worksheets
Excel allows you to hide worksheets so that they aren't visible to those using your workbook. Hiding worksheets has a ...
Discover More
Adding Parentheses
Need to add parentheses around some word or phrase? Here's a quick macro that makes this simple edit in one step.
Discover More
when creating labels, where do you indicate what your label size will be?
Source: https://wordribbon.tips.net/T012500_Creating_Labels.html
Posted by: rondonsecandent.blogspot.com
0 Response to "when creating labels, where do you indicate what your label size will be?"
Post a Comment