

How To Draw A Cute Bicycle
How To Draw A Bike
Cartoon a cycle is hard because all angles on a bicycle are wrong
They are wrong of grade only in the sense, that they are not what we think they are. Not knowing these stubborn little incorrect angles is what makes cartoon a cycle such a nightmare. This is why I want to get over all the things I take learned in several years of being mystified by the process of drawing bicycles.
Drawing a bike is no trivial matter. Depict me a wheel and I know who yous are. Yous are probably funny.
I know I am in danger of spoiling this small personality test forever*, but the clients take been complaining and some may have fifty-fifty been handing round your sketches in the interruption-room for a good laugh. That is why you are here.
*As a substitute for this personality test I would recommend this: Draw me a map of Europe!
Only back to bicycles. Naturally, we just get into the basics. We are going to draw a common, semi-sporty bicycle in a side view. We are simplifying of course considering the tertiary dimension brings quite a few more than wrong angles to the table (as it usually does). The idea is to get a grip on bicycle geometry and the reason why it is the way information technology is. In one case we know why it is that mode, we volition remember it next time we draw information technology.
If you do not care nearly reasons and simply need a quick how-to, jump to the end of the article, where I tell you how to draw a wheel in four simple steps.

When we recollect of the basic geometry of a wheel, we tin simplify it to two connected triangles and a stick. (A) This type of frame is called a diamond frame. The drawing in (A) is super-simplified. The post-obit is a walkthrough of how to brand this into a proper bicycle frame.
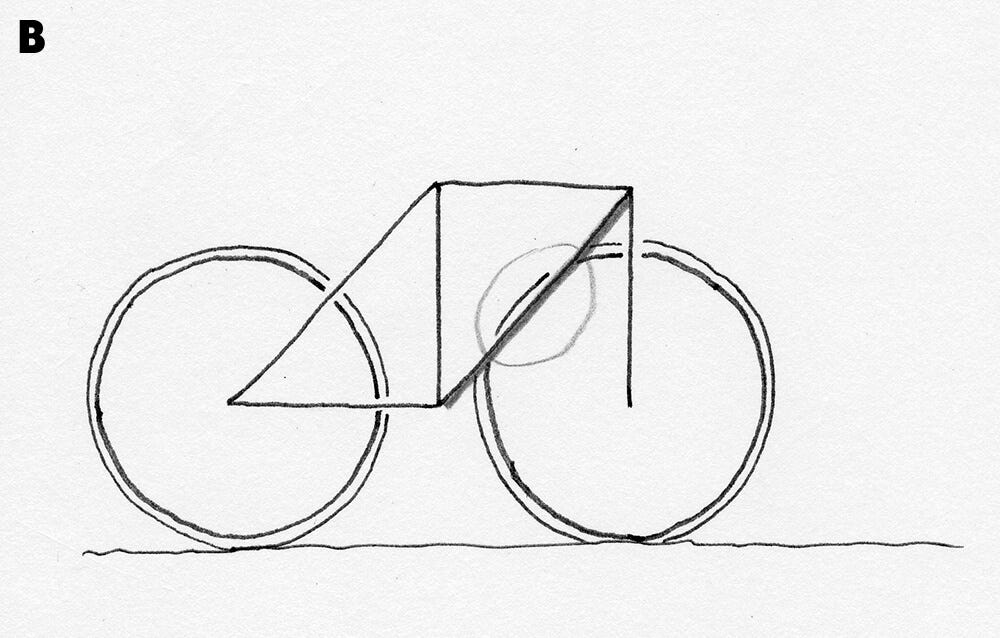
Get-go problems arise when nosotros add wheels to our frame. (B) The forepart bicycle, if about the same size as the rear cycle, will touch on the downward tube in our construction.

A common gear up for this is, to simply draw rather pocket-sized wheels, which makes the wheel expect … well, unrealistic. Especially the rear part, which looks now weirdly elongated.(C) And no, don't tell me it looks like a BMX — it doesn't.
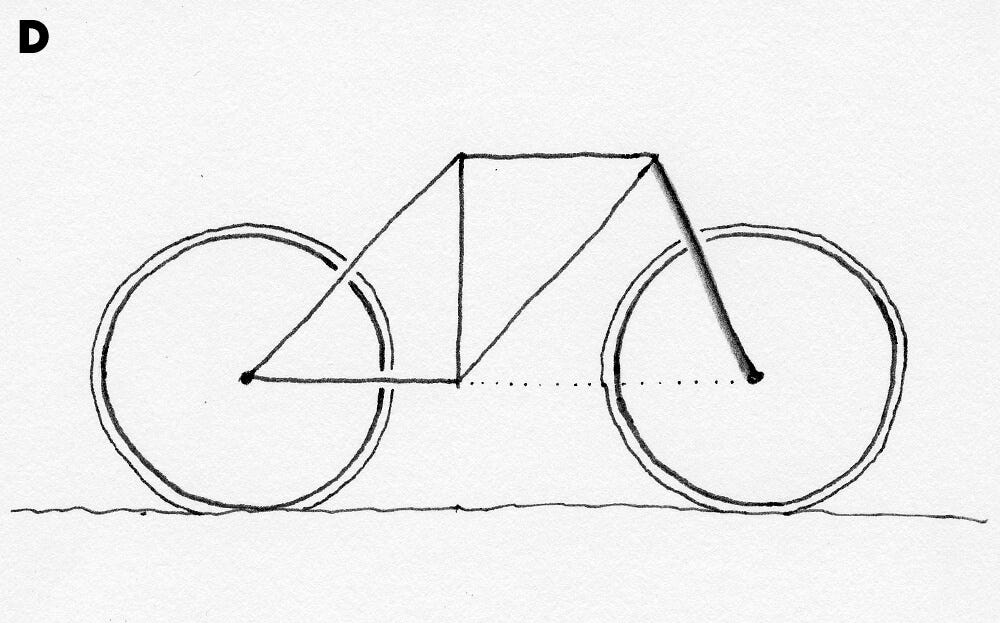
What we need to understand is that the fork holding the front bike is fishing forward, which creates sufficient room betwixt the downwardly tube and the bike. (D)
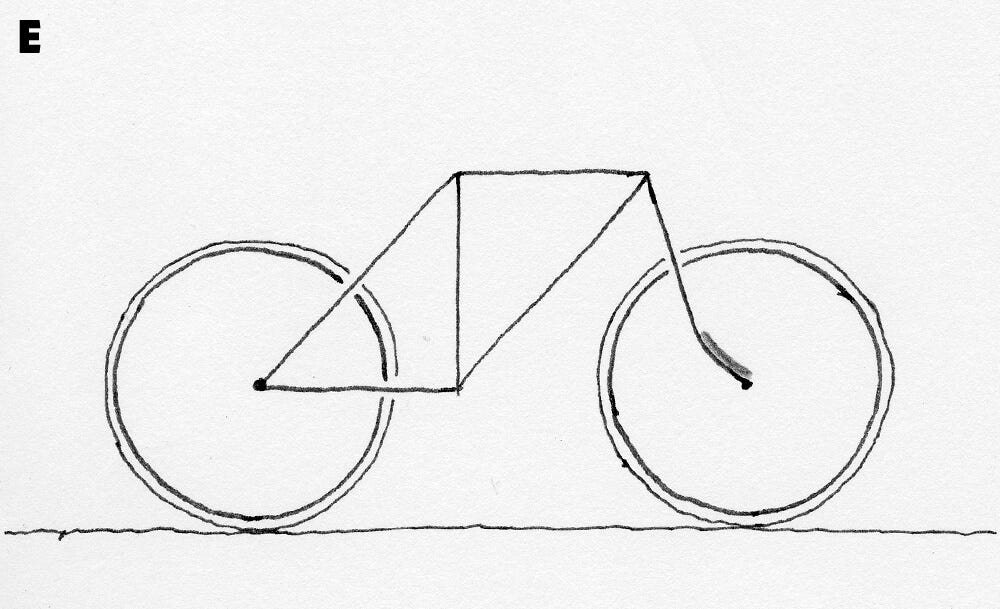
On some bikes, the fork does not encounter the wheel at the center in a straight line, but rather bends towards it in a nice piffling curve at the end. (E)
Success! We take a bicycle, with two wheels that have enough room to turn.

To get even closer to a realistic bike we will demand a few more ingredients. Hither it comes: the horizontal tube holding the rear wheel — the chain stay — is unremarkably angled slightly upwardly. (F) I humbly admit: this is a detail that escaped my notice for years.
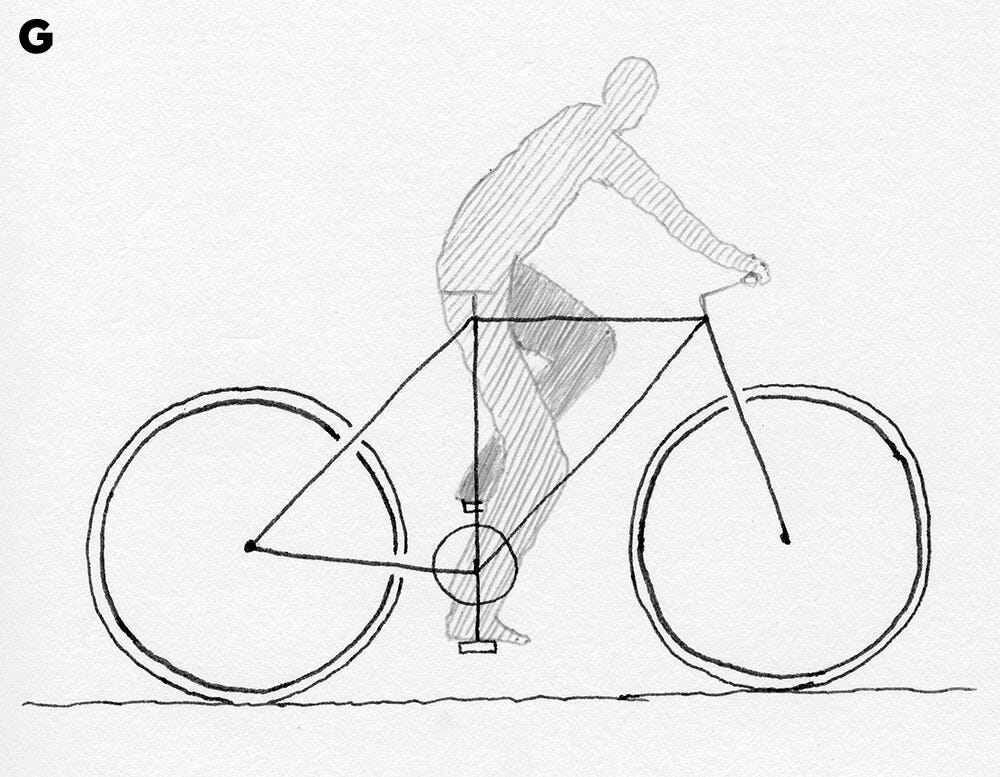
This bending allows the pedals to be simply a footling bit lower to the street. A person can now sit on the bike, and have his or her nearly stretched out legs resting on the pedal at its everyman point (G).
Now that you got the hang of these things your discerning middle tells you: It just does non look right, yet. Permit's continue logically.
Imagine you are the figure in (G). You lot had plenty of enjoying the view from your bicycle. Likewise: having both your feet on the pedals you start listing dangerously to one side — you ameliorate go going. Let'south get, let'southward drive!
As soon every bit we endeavor to push button the pedals, things are getting awkward. Why can't we create proper forward momentum? Why is this and so hard?
The reason is, that the concatenation ring and crankarms are directly below our sitting position. It is difficult for our anxiety to push the pedals forward. In other words: because we are on top of the pedals we cannot get our weight behind them. Backside them — that is the inkling here.

To remedy this, our body needs to sit down further back on the frame, and for that to happen the seat tube needs to be angled backwards. (H)
In this position, our legs are at a amend angle to really put pressure on the pedals every bit they circumduct down on the front side.
On a side note: the concatenation connects the chainring and pedals to the rear wheel, non to the front wheel or even both. Apparently, this is not a trivial thing — 12% of non-cyclists couldn't figure this one out even with a real bike in forepart of them according to this report.
Having placed the saddle backwards in (H), we find that the position of the handlebars is now further from the driver. He or she needs to sit bent over or be in possession of a set of very long artillery to grab them. On older style bikes the stalk (the angled tube holding the handlebars) may go astern towards the saddle (H), but on most mod bikes information technology goes forward. This allows for more effective steering.
The problem is the meeting point of the top tube and down tube under the head, see (H). They are not merely forming a tip of a triangle. Instead, they are both connected to another tube which our frame is missing up to this indicate entirely.
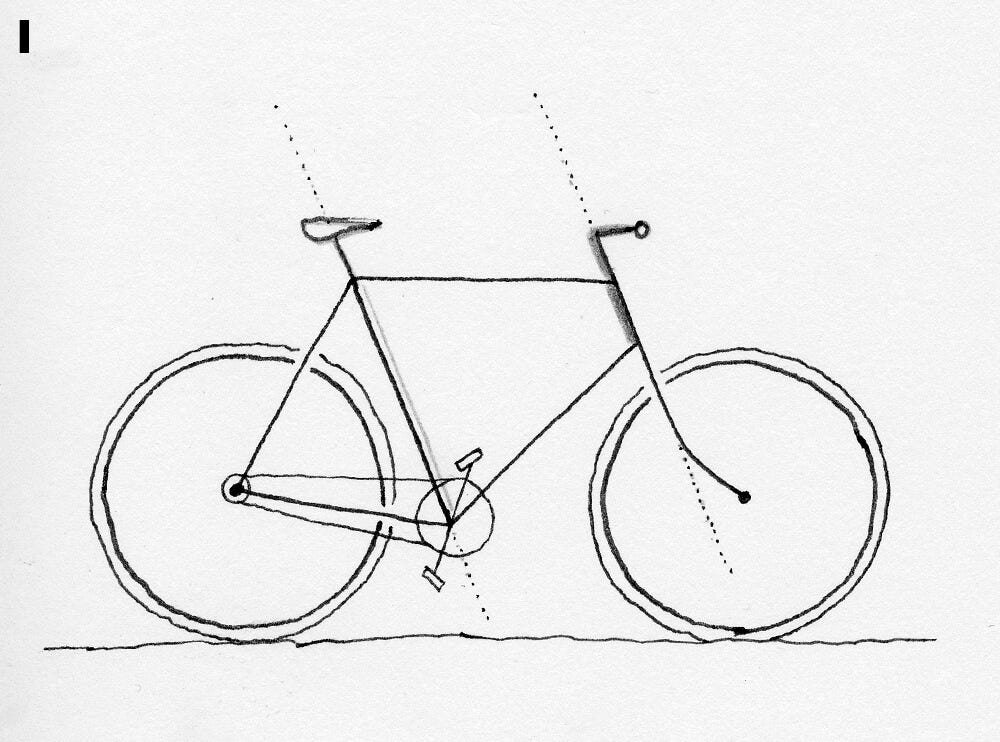
Information technology is called the head tube and information technology connects the head (handlebars etc.) to the fork of the front wheels (I). This short piece of tube is normally parallel to the seat tube. Notation how at present our head can go forward without existence too far to reach.
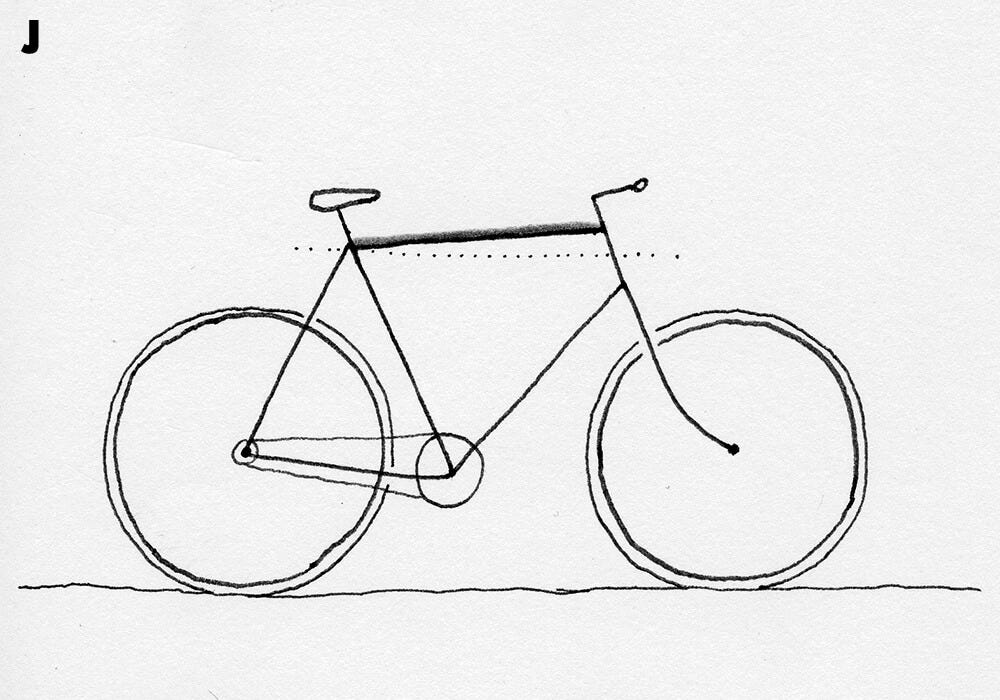
The top tube tin can be parallel to the basis but sometimes is as well lower on the side of the saddle. (J)
Now comes the skillful news: when you take reached this office of the cartoon, at that place is some room for adjustment (adulterous), by varying the height of the seat and the handlebars to brand a person fit on it. This tin also hide minor defects in your construction upward to now.

In a realistic setting, yous should be aware of the fact that the handlebar is normally not higher than the saddle. On mount or trekking bikes the seat and the handlebars are often at an equal superlative. On racing bikes, the seat is usually even higher than the handlebars. More often than not: the higher the seat and the lower the handlebar, the sportier the driving position (K).
Finally, a quick step-by-pace how I would recommend drawing a bicycle:

i) Start with the wheels. Make them fifty-fifty sized and leave less than one width of a wheels diameter of space between them. (L)
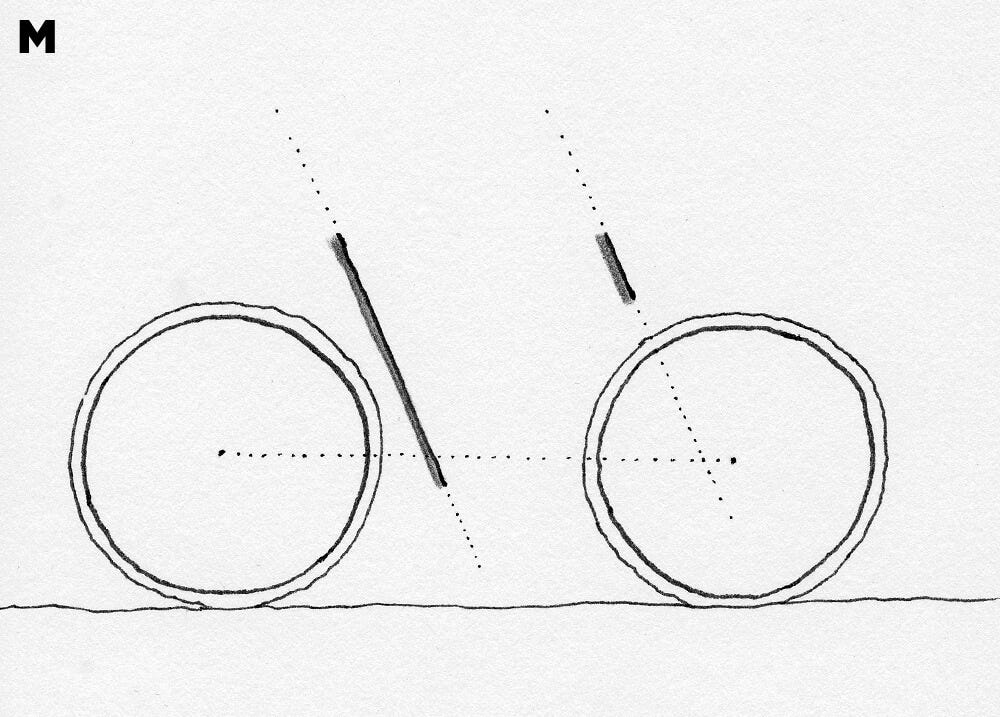
two) Depict the seat tube and the caput tube. (Thou) Remember to angle them backwards and to make them parallel. The caput tube should be pointing towards the eye of the front wheel, or slightly behind it if you prefer the curved-fork-type. The seat tube should be close to the rear wheel and extend a bit below the height of the wheel centers.
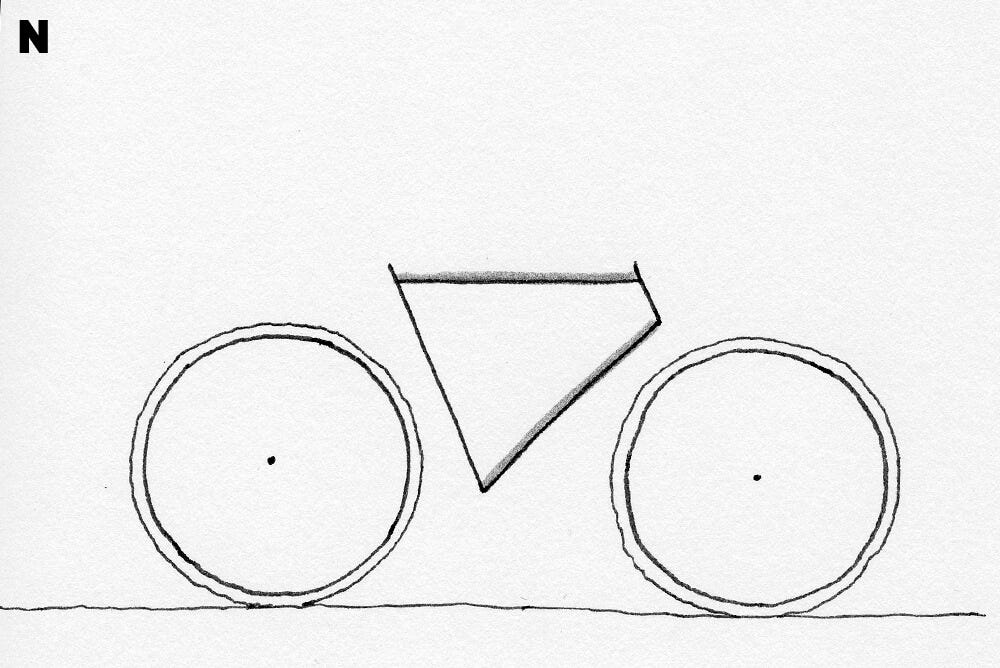
3) Draw the top tube and down tube. (Due north)

4) Last, but connect the existing frame to the center of the wheels. The seat stay and chain stay connect the rear wheel and the fork connects the forepart wheel. This gives u.s.a. our basic frame. (O)
From this bones diamond frame, a lot of different bicycle shapes tin can be derived. For example the nifty BMX style below. Maybe we have a look at that some other fourth dimension.
Congratulations: you accept successfully fatigued a not too implausible wheel. Information technology might even support a little person on it, without resorting to ergonomically strained positions or extremities of unbelievable dimensions.
Next time: how to depict a map of Europe.

Daniel Stolle is a professional illustrator living in Republic of finland.
world wide web.danielstolle.com

Source: https://medium.com/@danielstolle/how-to-draw-a-bicycle-ab8bd9ae27e1
Posted by: rondonsecandent.blogspot.com
0 Response to "How To Draw A Cute Bicycle"
Post a Comment