

When Does It Make Sense To Use A Template? When You Are Moving From Another Program To Access
This topic describes the techniques you tin can use to change an existing Admission report. Access provides 2 views that you tin can use to make changes to your report: Layout view and Design view. Your choice of which view to utilise depends on what specific job you are trying to accomplish. You might end up using both views to make your changes.
What do you want to do?
-
Empathize Layout view
-
Understand Pattern view
-
Switch between views
-
Modify your report in Layout view
-
Change your report in Design view
Sympathize Layout view
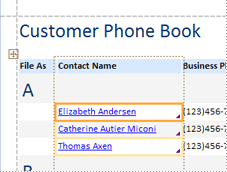
Layout view is the most intuitive view to use for report modification, and can exist used for about all the changes you would want to brand to a report in Access. In Layout view, the report is actually running, so you tin see your data much as it will announced when printed. However, y'all tin can also make changes to the study pattern in this view. Because you can run across the information while you are modifying the study, it's a very useful view for setting column widths, add grouping levels, or performing virtually any other chore that affects the appearance and readability of the report. The following illustration shows a Customer Phone Book report in Layout view.
The report you lot encounter in Layout view does not look not exactly the aforementioned as the printed report. For instance, there are no page breaks in Layout view. Also, if you have used Page Setup for format your report with columns, the columns are not displayed in Layout view. Notwithstanding, Layout view gives you a very close approximation of the printed written report. If you want to run into how the written report will look when printed, utilize Print Preview.
Certain tasks cannot be performed in Layout view, and require you to switch to Pattern view. In certain situations, Admission volition display a bulletin telling you that you must switch to Design view to make a particular alter.
Sympathize Design view
Design view gives you a more detailed view of the construction of your report. You can encounter the header and footer bands for the report, page, and groups. The report is non actually running in Pattern view, so yous cannot see the underlying data while working; notwithstanding, there are certain tasks you lot can perform more than hands in Design view than in Layout view. Y'all can:
-
Add a wider variety of controls to your study, such as labels, images, lines, and rectangles.
-
Edit text box control sources in the text boxes themselves, without using the property sheet.
-
Change certain properties that are non available in Layout view.
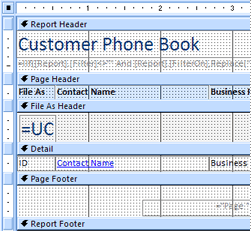
The following illustration shows a Customer Phone Volume study in Design view.
Switch between views
Admission provides a variety of methods for switching between views. If the report is already open, you tin can switch to another view by doing one of the following:
-
Correct-click the report in the Navigation Pane, and then click the view you want on the shortcut menu.
-
Right-click the report'south document tab or title bar, and and then click the view you want on the shortcut menu.
-
On the Home tab, in the View group, click the View push to toggle between bachelor views. Alternatively, you tin can click the pointer nether View, and and so select one of the available views from the menu.
-
Right-click in a blank area of the report itself, and then click the view you want. If the report is open up in Design view, you must right-click outside of the design grid.
-
Click 1 of the pocket-size view icons on the Admission status bar.
If the report is not open up, double-click the report in the Navigation Pane to open it in Written report view. To open the report in another view, right-click the written report in the Navigation Pane and then click the view y'all want on the shortcut card.
Note:If you are modifying a study in which you take used Page Setup to create multiple columns (for instance, a mailing label report), you tin only view the columns in Print Preview. When you view the report in Report view or Layout view, Access displays the data in a single cavalcade.
Modify your report in Layout view
This department describes some of the common study modifications that you can perform in Layout view.
Change column or field width in Layout view
-
Click an item in the column that you desire to adjust.
A border is drawn around the particular to indicate that the field is selected.
-
Elevate the correct or left edge of the edge until the cavalcade is the width you want.
Change row or field height in Layout view
-
Click an item in the row that you want to arrange.
A border is drawn around the item to bespeak that the field is selected.
-
Drag the top or bottom edge of the border until the row is the height you want.
Add a field in Layout view
-
On the Design tab, in the Tools group, click Add Existing Fields.
The list of available fields is displayed. If in that location are fields available in other tables, these will be displayed under Fields bachelor in other tables:.
-
Elevate a field from the Field Listing onto the report. Every bit you lot move the field, a highlighted surface area volition indicate where the field will be placed when you release the mouse button.
Annotation:To add multiple fields at one time, hold downward the CTRL key and click each field in the Field List that you want. Then, release the CTRL key and drag the fields onto the report. The fields volition exist placed adjacent to each other.
Acme of Page
Understand control layouts
Control layouts are guides that align your controls horizontally and vertically to requite your report a compatible advent. Yous can think of a control layout as a tabular array, where each cell of the tabular array contains a control. The following procedures prove you how to add, remove, or rearrange controls in control layouts.
Control layouts come in two varieties: tabular and stacked.
-
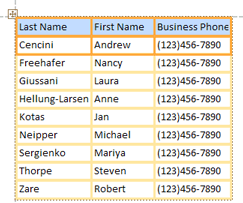
In tabular control layouts, controls are bundled in rows and columns like a spreadsheet, with labels beyond the height. Tabular control layouts always span two sections of a report; whichever section the controls are in, the labels are in the section to a higher place them. The following analogy shows a basic tabular control layout.
-
In stacked layouts, controls are arranged vertically like you might see on a newspaper form, with a label to the left of each control. Stacked layouts are e'er contained inside a unmarried written report department. The following illustration shows a bones stacked control layout.

You can have multiple control layouts of either type on a report. For example, you might have a tabular layout to create a row of data for each record, and then one or more than stacked layouts underneath, containing more information from the aforementioned tape.
Create a new control layout
Access automatically creates columnar control layouts in the following circumstances:
-
You create a new report by clicking Written report
 in the Reports group on the Create tab.
 -
You create a new report by clicking Blank Study
 in the Reports group on the Create tab, and then dragging a field from the Field List pane to the written report.
On an existing written report, you can create a new control layout by doing the following:
-
Select a control that you desire to add to the layout.
-
If y'all want to add other controls to the same layout, agree down the SHIFT key and as well select those controls.
-
Do one of the following:
-
On the Arrange tab, in the Table group, click Tabular or Stacked.
-
Correct-click the selected control or controls, point to Layout, and and so click Tabular or Stacked .
-
Access creates the control layout and adds the selected controls to it.
Switch a control layout from tabular to stacked, or from stacked to tabular
To switch an unabridged layout from one blazon of layout to the other:
-
Select the control layout past clicking the orange layout selector at the top left corner of the layout.
All the cells in the layout are selected.
-
Do 1 of the following:
-
On the Accommodate tab, in the Table group, click the layout type you lot want (Tabular or Stacked).
-
Right-click the control layout, indicate to Layout, and then click the layout type you want.
-
Admission rearranges the controls into the layout type you lot selected.
Separate one control layout into two layouts
You can dissever a control layout into two layouts by using the post-obit process:
-
Hold downward the SHIFT cardinal and click the controls yous want to move to the new control layout.
-
Exercise one of the following:
-
On the Suit tab, in the Table grouping, click the layout type you want for the new layout (Tabular or Stacked).
-
Right-click the selected controls, point to Layout, and then click the layout type y'all want for the new layout.
-
Access creates a new control layout and adds the selected controls to it.
Rearrange controls in a control layout
-
You can move a control within a control layout by dragging it to the location you want. As you drag the field, a horizontal or vertical bar indicates where it volition be placed when you release the mouse button.
-
You lot tin move a control from one control layout to another control layout of the same type. For example, yous can drag a command from one stacked layout to another stacked layout, only non to a tabular layout.
Add controls to a command layout
To add a new field from the Field List pane to an existing command layout
-
Merely drag the field from the Field List pane to the layout. A horizontal or vertical bar indicates where the field will be placed when you release the mouse button.
To add together existing controls to an existing command layout
-
Select the first command that y'all want to add to the control layout.
-
If yous want to add other controls to the same layout, hold downwards the SHIFT key and as well select those controls. Yous can select controls in other control layouts.
-
Do one of the following:
-
If the study is open in Design view, drag the selected fields to the layout. A horizontal or vertical bar indicates where the fields volition be placed when you release the mouse button.
-
If the report is open in Layout view:
-
On the Conform tab, in the Tabular array group, click the type of the layout you are adding to. If you are adding to a tabular layout, clickTabular. If you are adding to a stacked layout, clickStacked.
Access creates a new layout and adds the selected controls to it.
-
Drag the new layout to the existing layout. A horizontal or vertical bar indicates where the fields will exist placed when you release the mouse push button.
-
-
Remove controls from a command layout
Removing a command from a control layout allows y'all to place it anywhere on the written report without affecting the positioning of whatsoever other controls.
-
Select the command yous want to remove from the layout. To select multiple controls, agree downward the SHIFT key and and then click the controls that you want to remove. To select all of the controls in the layout, click the layout selector box at the summit left corner of the layout.
-
Right-click one of the selected controls, point to Layout, and then click Remove Layout.
Access removes the selected controls from the layout.
Tip:To prevent a control from being inserted into a control layout as you motion it, press and hold the CTRL key, and and then drag the control to where you lot want it.
Pinnacle of Page
Delete a field or cavalcade
-
Click the field or column to exist deleted, or click its label or cavalcade heading.
Access draws a border around the item to bespeak that information technology is selected.
-
Press DELETE.
Modify page setup
Use the Page Size and Page Layout groups on the Page Setup tab to modify size, orientation, margins, and and so on.
-
Click the Page Setup tab.
-
In the Page Size grouping, click Size to select a different paper size.
-
In the Page Size group, click Margins to make adjustments to the report'due south margins.
-
In the Page Layout group, click Portrait or Landscape to modify the paper orientation.
Change the formatting of a field
-
Select the field that you want to format.
-
On the Format tab, use the tools in the Font grouping to apply the formatting you want.
Demark a text box to a dissimilar field (change the control source of a control)
-
Click within the cavalcade or the field for which you desire to change the control source.
A edge is drawn effectually the detail to betoken that the field is selected.
-
If the property sheet is not currently displayed, printing F4 to display information technology.
-
On the Information tab of the property sheet, prepare the ControlSource property to the new field. You tin can either select a field from the drop-down list, or you can type an expression in the box.
Change the record source of the written report
-
If the property sheet is not displayed, press F4 to display it.
-
In the drop-down list at the pinnacle of the property sail, click Written report.
-
In the property canvas, click the Data tab.
-
In the Record Source drop-downward list, select the table or query that yous desire to use for a record source, or click
 to display the Query Builder.
Note:If the report is currently based on a table, Access asks if yous desire to create a query based on the table. Click Yep to display the Query Builder and create the query, or click No to cancel the performance. If you choose to create a query, the new query will become the tape source of the study. It will be created as an "embedded" query — that is, a query that is stored in the written report's RecordSource property, rather than as a separate query object.
Wrap text in a field
-
If the property sheet is not displayed, right-click the field in which y'all want the text to wrap, and click Properties. Otherwise, merely click the field to select it.
-
On the Format tab of the property sail, ready the CanGrow property toYes.
Add gridlines
If your controls are contained in a command layout, you can add gridlines to provide more visual separation between the controls.
-
Click any field in a command layout.
A border is drawn around the field to point that it is selected.
-
On the Suit tab, in the Tabular array group, click Gridlines.
-
Select the style of gridlines you want from the drop-downwardly list.
Annotation:You can also add gridlines past right-clicking any field in a control layout, pointing to Layout, pointing to Gridlines , and so selecting the type of gridlines you want.
Tiptop of Page
Add or modify a logo or other image
The post-obit procedures show yous how to add a logo to a report by using the Logo tool, and how to resize an paradigm command or an paradigm inside an paradigm control.
Add together a logo
-
On the Design tab, in the Header/Footer group, click Logo.
The Insert Picture dialog box is displayed.
-
Scan to the folder where your logo file is stored, and double-click the file.
Admission adds the logo to the upper left corner of the report.
Resize a command that contains a logo or other image
-
Click the command that contains the image.
A edge is fatigued around the control to indicate that information technology is selected.
-
Place the pointer on the border. When the pointer becomes a double-headed arrow, you tin can drag information technology in the directions indicated by the arrows to brand the image control larger or smaller.
Note that the default value for the Size Mode property of an image is Clip, significant that the image will stay the same size regardless of how large or small y'all make the image control. If you want the epitome to get larger or smaller as y'all resize the control, practice the following:
Resize the logo or image inside the command
-
Select the image.
-
If the belongings canvas is not already displayed, printing F4 to display it.
-
On the Format tab of the holding sheet, set the Size Mode property to the selection you want:
| Setting | Description |
| Clip | The image stays the same size, regardless of how big or pocket-size you lot brand the paradigm command. If you brand the prototype control smaller than the paradigm, the image is clipped. |
| Stretch | The image is stretched both vertically and horizontally to lucifer the size of the paradigm command. The original aspect ratio of the image is not preserved, so this setting can result in a distorted epitome unless yous precisely prepare the superlative and width of the image control. |
| Zoom | Every bit the image control is resized, the image adjusts to be as large as possible without affecting the original aspect ratio of the image. |
Top of Folio
Add or edit a report championship
The following procedures prove you how to add or edit a characterization containing the report'due south title.
Add a title to a report
-
On the Design tab, in the Header/Footer grouping, click Championship.
A new label is added to the study header, and the written report name is entered for you every bit the report title.
-
When the label is created, the text in the label is selected for you so that if you want to change the text, you lot tin just begin typing the title you want.
-
Press ENTER when you lot take finished.
Edit the study title
-
Double-click the label containing the report championship to place the cursor in the label.
-
Type the text yous want to utilize every bit the report championship, and press ENTER when you have finished.
Add page numbers, the current date, or the current time
The following procedures show you how to add together page numbers to a written report, and how to add together the current date or the electric current fourth dimension.
Add page numbers
-
On the Design tab, in the Header/Footer grouping, click Page Numbers.
The Folio Numbers dialog box is displayed.
-
Cull the format, position, and alignment you want for the folio numbers.
-
Articulate the Show Number of First Folio cheque box if you practise not desire a number on the first page.
-
Click OK.
The page numbers are added to the report. Switch to Print Preview to encounter how the numbers will look when you print the report.
Add the engagement or time
-
On the Design tab, in the Header/Footer group, click Date and Time.
The Date and Time dialog box is displayed.
-
Articulate the Include Date check box if you do non want to include the date.
-
If you want to include the date, click the engagement format you want.
-
Clear the Include Time check box if yous practise not desire to include the time.
-
If you lot desire to include the fourth dimension, click the time format you lot want.
A sample of the date and time, in the formats y'all accept chosen, appears in the Sample area of the dialog box.
-
Click OK.
Modify your written report in Design view
In some cases, you lot cannot perform certain modifications to your report in Layout view, and must instead apply Pattern view.
Add line numbers
-
On the Design tab, in the Controls group, click Text Box.
-
Click in an open area of the section where yous want the line numbers to announced. In most cases, this will be the Detail section. Y'all will move the text box to its final location afterwards.
When you click the report, Access creates a new, unbound text box.
-
Click the label (merely to the left of the new text box), and printing DELETE.
-
Click in one case in the new text box to select it, and then click again to position the cursor in the text box.
-
Blazon =ane and so press ENTER.
-
If the property canvass is not already displayed, press F4 to display it.
-
On the Data tab of the belongings canvas, fix the Running Sum property to Over All.
Note:If this is a grouped written report, and you desire the numbering to offset at 1 for each grouping, set the property to Over Group.
-
Resize the text box to a smaller width past positioning the pointer over the sizing handle on the right border of the text box and dragging it to the left. Leave enough room for the largest line number you lot expect to see on this study.
-
If needed, make room for the text box on the far left edge of the Detail section by dragging the existing controls in that section to the correct, or past resizing the leftmost control in that section.
-
Drag the new text box to the location that you desire it on the written report.
-
Switch to Written report view, Print Preview, or Layout view to come across the line numbers.
Make a group header appear at the top of each page
For groups that span multiple pages, it is helpful to have the group header appear at the meridian of each page then that you lot can easily see which group the data are in. You can select a group header in Layout view, but it is easier to practise this in Blueprint view.
-
Double-click the grouping header section selector (the horizontal bar to a higher place the group header section).
-
On the Format tab of the holding canvass, set the Repeat Section holding to Yes.
Open a subreport in its own Design view window
When y'all open a report in Pattern view, any subreports independent on the report are also opened in Design view. Even so, each subreport is displayed inside its subreport control, not as a dissever window. Since the subreport control is ofttimes too modest to work in easily, information technology is ordinarily more convenient to open up the subreport in its own window and and then edit it. To open up a subreport in a new window, do one of the following:
-
Select the subreport, so on the Blueprint tab, in the Tools group, click Subreport in New Window.
-
Click once exterior of the subreport control to make sure that it is not selected, and so right-click inside the subreport control and so click Subreport in New Window.
Top of Folio

When Does It Make Sense To Use A Template? When You Are Moving From Another Program To Access,
Source: https://support.microsoft.com/en-us/office/modify-edit-or-change-a-report-2837aea7-0ee5-4c81-9f0f-5cf324c2c3bd
Posted by: rondonsecandent.blogspot.com
0 Response to "When Does It Make Sense To Use A Template? When You Are Moving From Another Program To Access"
Post a Comment